Domestic Water Pump Installation Tips
Ensure the pump is the right size for your application, before you install it. A pump that is under-sized is not faulty and is not covered by warranty. Ensure the right size piping is used, small pipes reduce performance and cause the pump to use more power! Refer to the information on the box and/or label on the pump for the performance data. If in doubt consult with your dealer or a pump technician to ensure your pump is sized to suit your needs.
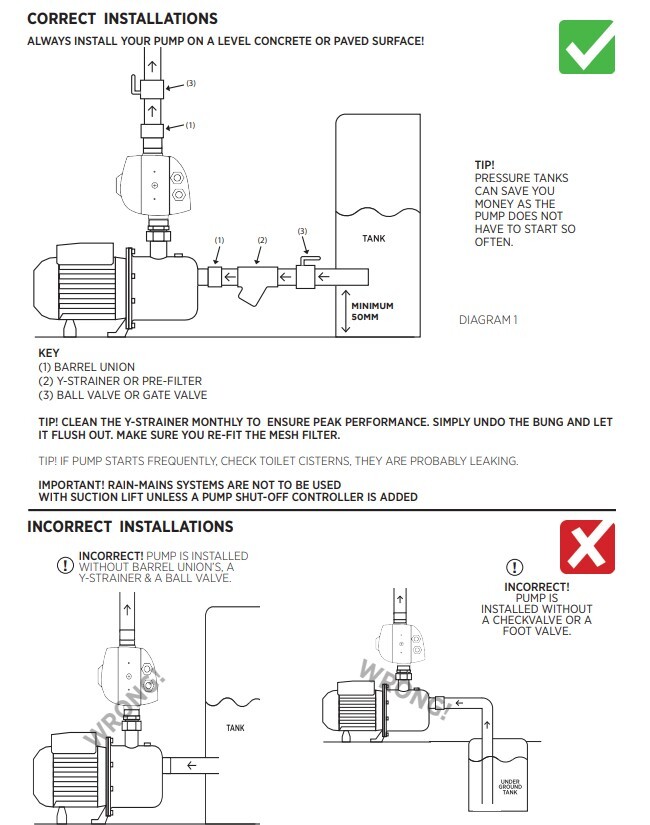
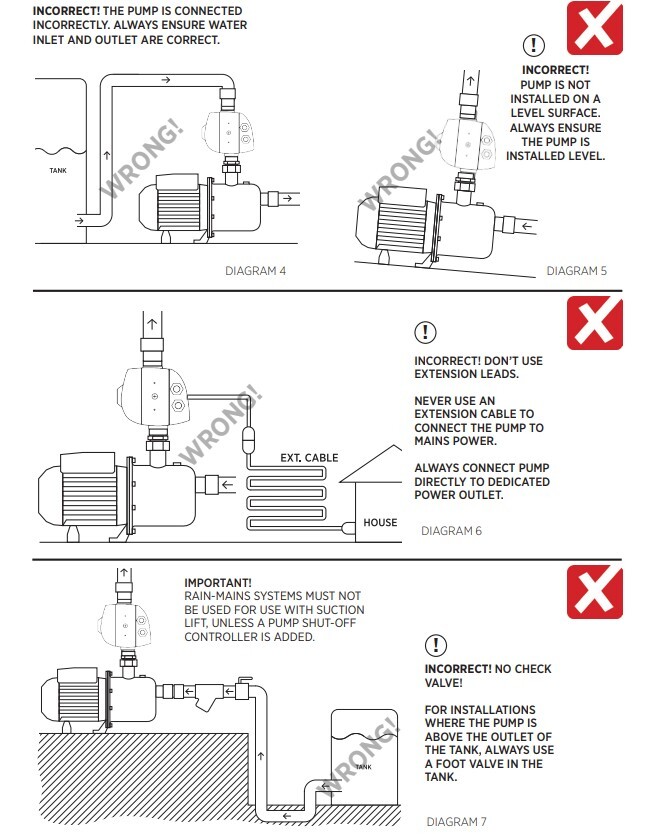
1A. Before installing or servicing disconnect from the power supply. All pumps must be installed using barrel-union connections to facilitate easy servicing or replacement. Ball-valves or gate-valves must be fitted on the suction, and the discharge, and the Town-water backup supply where fitted. A Y-Strainer or Pre-filter must be installed on the suction to prevent particles entering the pump. Remove all swarf from the tank after cutting openings etc – swarf in the pump voids warranty. All instructions are conditions of warranty; all warranty is void if instructions are not followed. It is recommended to install a Check-Valve in the discharge pipework, however DO NOT install the check valve directly on the discharge of the Pressure Controller, as this may cause it to malfunction, install the Check-Valve further down the pipe, before the first point of discharge.
2. POSITION TO AVOID SLUDGE INTAKE: Do not position the pump where it could take in solids or sludge.
3. PROTECT FROM THE WEATHER: The pump must be protected from the weather, by way of a plastic pump cover or skillion roof cover, or similar. However the installer must ensure that there is adequate ventilation so the pump does not overheat
4. Must be installed in a well-ventilated and drained area: This pump MUST NOT be installed in any manner that if it were to leak that it would cause damage or loss to property or persons. It MUST be installed in a well-ventilated and drained area. All warranty is void if this condition is not heeded and no liability can be accepted in the case of damage or loss caused by failing to comply with this condition. If the pump leaks, the water must be able to drain away from the pump and not cause damage.
5. BASE must be LEVEL Fix the pump in place through the footplate using suitable fasteners, on a stable, level surface – the base must NOT be sloping even slightly – ensure it is level.
6. IMPORTANT NOTE re PUMP NOISE: Avoid installing pumps near bedrooms or neighbours bedrooms. Particularly JET pumps, due to their self-priming design they typically make more noise than a MULTISTAGE Pump. This is a feature of the pump design, it is not a fault, and is not a cause for warranty claims, as it is not a product fault. If noise is likely to cause problems, we recommend that you use a MULTISTAGE Pump, and install the pump AWAY from bedrooms. Some city & shire councils have very strict rules regarding noise levels, it is the installersand owners responsibility to ensure compliance as we have no control over the installation of this product.
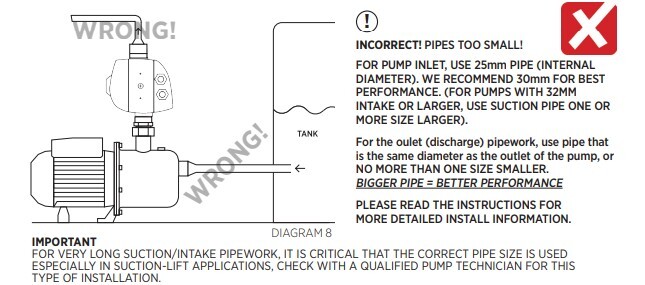
7.PIPE SIZE AND TYPE: Install the pump as near the water supply as possible to reduce the length of suction pipe. We recommend heavy duty flexible suction hose for the inlet (Suction Pipe) but whatever pipe is used it must be no less than the same Internal Diameter as the PUMP INLET (1 size bigger is better), and heavy-duty pressure hose or similar for the outlet, we recommend the Internal Diameter for the delivery pipework is the same as the PUMP OUTLET for the best performance, or no more than one size less than the Pump Outlet Internal Diameter. If the pump is for “Whole of house” supply (check is your pump big enough first!!) we strongly recommend that 25mm Internal Diameter piping is used throughout the house, and is only reduced to connect to the fixtures as required, this will ensure that the pump delivers best performance and efficiency, saving the user money over the long-term. Use as few bends as possible, every bend reduces performance. The suction and delivery piping must be fitted so as not to be able to apply any mechanical pressure on the pump and controller. If your house has more than 3 bathrooms you MUST consult with a Pump Specialist to ensure you size your Pump and Pipework correctly – remember that a short term saving could become a long-term


